🌕 Supermoon Night Comfort Food | Korean Dumpling Ramen🍜

Korean Dumpling Ramen

Sometimes ramen is just a quick meal,
but there are days when I want to make it feel like a real dish.
That’s when I cook it this way — cozy, flavorful, and a little special. 🍜

사실 라면은 간편하게 먹는 음식이지만,
가끔은 정말 요리처럼 즐기고 싶을 때가 있어요.
그럴 때 저는 이렇게 만들어 먹곤 해요. 🍜

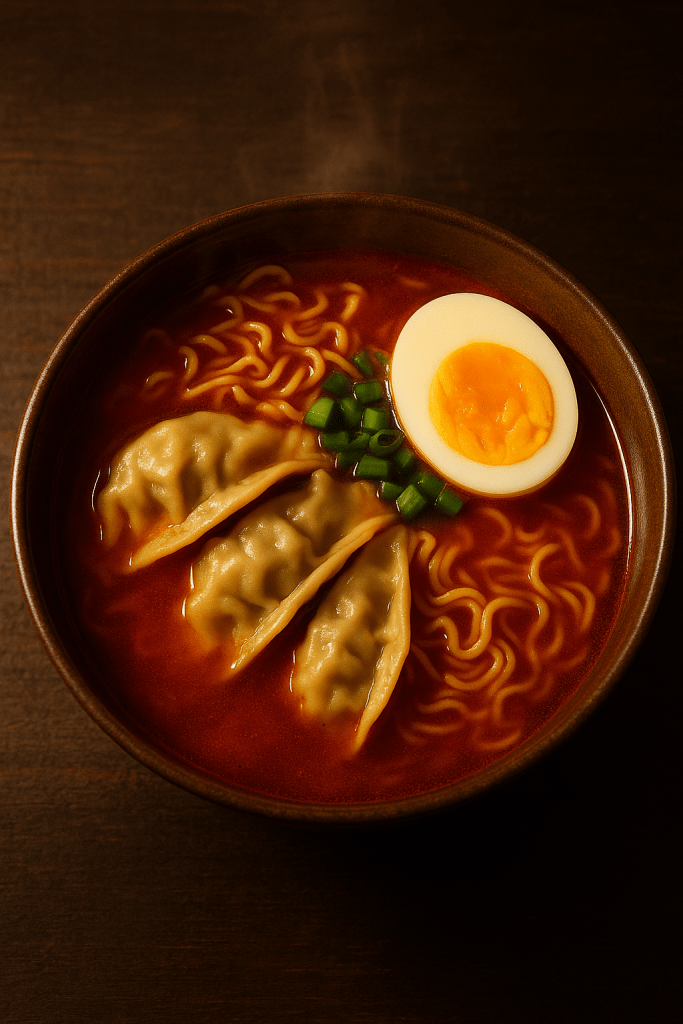
On bright supermoon nights, a warm bowl of spicy Korean Dumpling Ramen is the perfect comfort food.
쫄깃한 면, 부드러운 만두, 반숙 달걀의 조합은 언제 먹어도 완벽하죠.


🥣 Ingredients | 재료

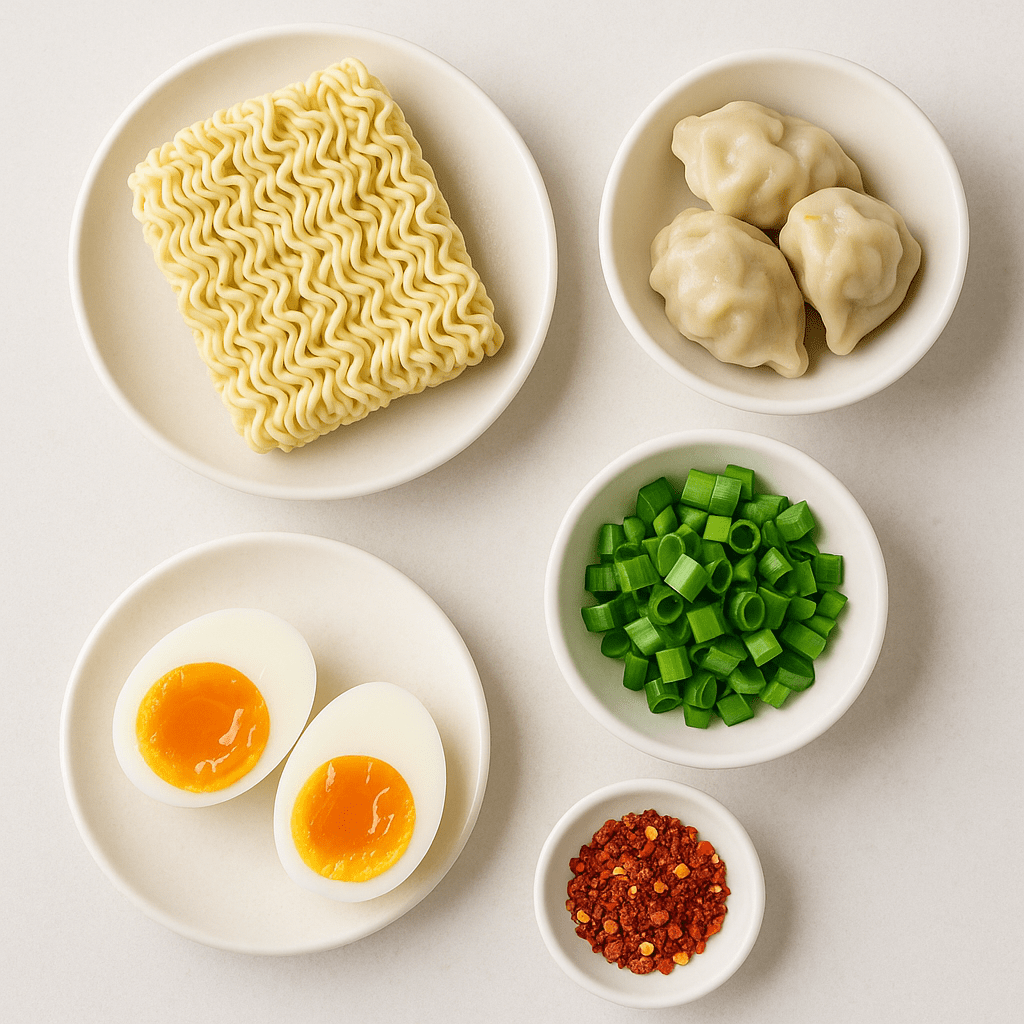
  • 1 pack of ramen noodles | 라면 1개
  • 2–3 dumplings (kimchi, pork, or veggie) | 만두 2~3개 (김치, 고기 또는 채소만두)
  • 1 soft-boiled egg | 반숙 달걀 1개
  • Chopped green onion | 대파 약간
  • Gochujang or chili flakes (optional) | 고추장 또는 고춧가루 (기호에 따라)

🔥 How to Cook | 조리법

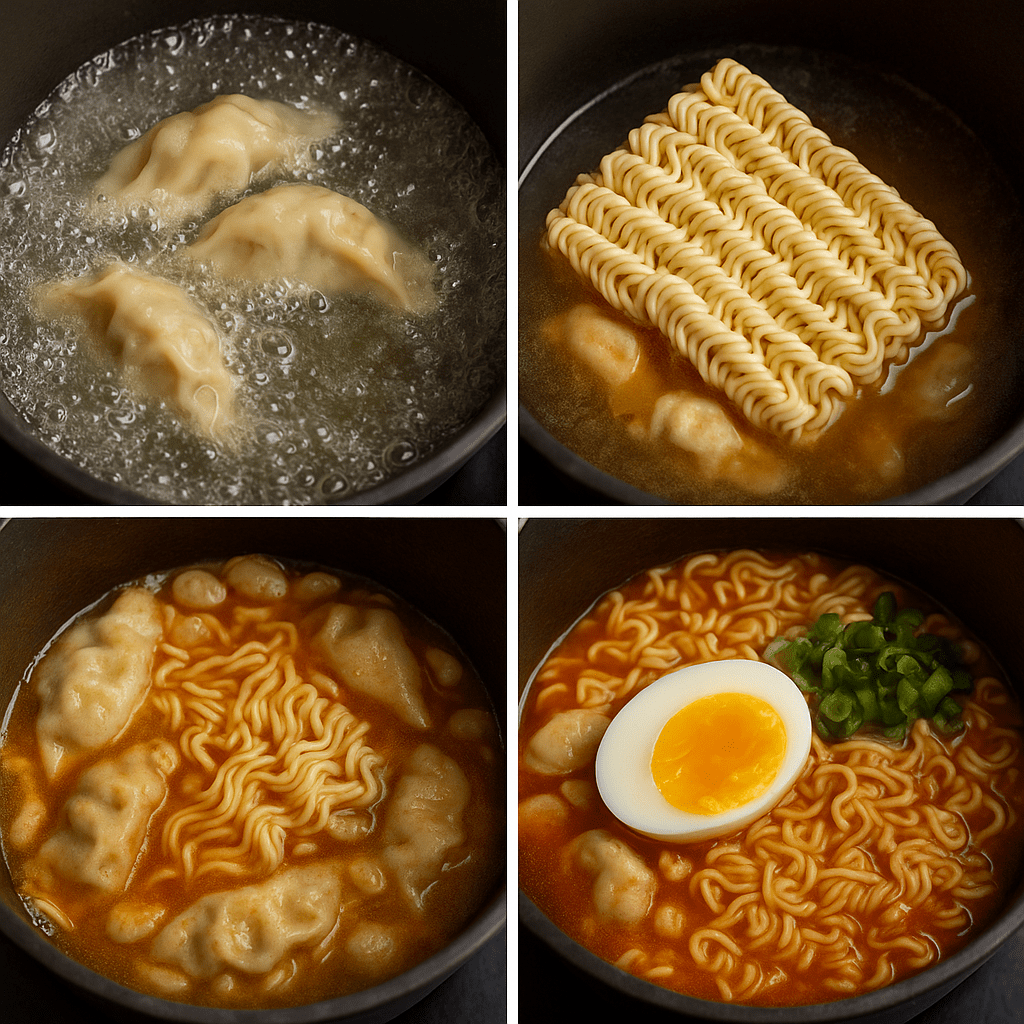
  1. Boil water in a pot. | 냄비에 물을 끓입니다.
  2. Add frozen dumplings first and boil for 1–2 minutes. | 냉동 만두를 먼저 넣고 1~2분간 끓입니다.
  3. Add ramen noodles and seasoning, then cook for another 3 minutes. | 그다음 라면과 스프를 넣고 3분 정도 함께 끓입니다.
  4. Add green onions and simmer on low heat. | 대파를 넣고 약불에서 한소끔 더 끓입니다.
  5. Top with a soft-boiled egg and enjoy hot! 🌕 | 반숙 달걀을 올리고 따뜻하게 바로 먹어요. 🌕

❄️ Frozen Dumpling Tips | 냉동 만두 사용 팁

  • Do not thaw. Use them frozen to keep the skin from breaking.
    해동하지 말고 그대로 사용하세요. 만두피가 물러 터질 수 있어요.
  • Add dumplings 1–2 minutes before noodles.
    라면보다 1~2분 먼저 넣으면 속까지 잘 익어요.
  • Large pork dumplings? Cover and let sit for 1 minute after turning off the heat.
    크기가 큰 고기만두는 불을 끄고 뚜껑을 덮어 1분 뜸 들이기.
  • Total cooking time: about 5–6 minutes.
    총 조리 시간은 약 5~6분.

📌 Summary 요약

Frozen dumplings → No thawing → Add 1–2 minutes before noodles


🥚 Perfect Ramen Egg | 라면용 반숙 달걀

  1. Put cold water + cold eggs in a pot. | 냄비에 찬물 + 냉장 달걀을 넣습니다.
  2. Heat on medium and boil for 8 minutes total (from the moment you turn on the heat). | 불을 켠 순간부터 8분간 삶습니다.
  3. Transfer to ice water for 5 minutes. | 얼음물에 5분 이상 담가 식힙니다.
  4. Slice in half — firm outside, soft center. | 반으로 자르면 겉은 익고 속은 살짝 흐르는 반숙 완성!

📌 Formula 공식

From cold water → Boil 8 min → Ice water 5 min


🛒 Where to Buy Dumplings | 만두 구입 팁

You can find great frozen dumplings at H Mart, 99 Ranch, Costco, or Trader Joe’s.
미국에서는 H Mart, 99 Ranch, Costco, Trader Joe’s 등에서 쉽게 구할 수 있어요.
Recommended brands: Bibigo, Pulmuone, CJ
추천 브랜드는 Bibigo, Pulmuone, CJ
Vegetable dumplings pair best with spicy ramen; pork dumplings add rich flavor.
매운 라면엔 채소만두, 깊은 맛엔 고기만두가 잘 어울려요.


🍚 Leftover Broth Ideas | 남은 국물 활용법

Don’t pour out that spicy ramen broth — it’s full of flavor!
매운 라면 국물, 그냥 버리기 아깝죠?

  1. Ramen Porridge Style | 라면죽 스타일
    • Add half a bowl of rice and one egg yolk into the leftover broth.
      남은 국물에 밥 반 공기와 달걀 노른자 1개를 넣고 약불에서 살짝 끓여주세요.
    • Finish with seaweed flakes and a few drops of sesame oil for a soft, savory flavor.
      마지막에 김가루와 참기름 몇 방울을 더하면 부드럽고 고소한 라면죽 완성!
  2. Tteok-Mandu Soup Style | 떡만두국 스타일
    • Remove any leftover noodles and add rice cakes or dumplings instead.
      면을 건져내고 떡이나 만두를 넣고 다시 끓이면
      완전히 다른 따뜻한 K-푸드 국물요리로 변신합니다.

📌 Tip 팁

Leftover broth = your next meal. Don’t waste it — reuse and reinvent!
남은 국물 = 다음 한 끼의 시작. 버리지 말고 다시 끓여보세요.


A cozy bowl of dumpling ramen under the supermoon — simple, warm, and a little magical. 🌕
The gentle steam, the spicy aroma, and the quiet glow of the moon make this meal feel like comfort in its purest form.
Sometimes, that’s all we need — a warm bowl, a quiet night, and a little time to breathe.

🍗 Easy Korean Fried Chicken (Sweet & Spicy Gochujang Wings)_Oven/Air Fryer

Sweet & Spicy Gochujang Wings (Oven & Air Fryer Only)

No deep-frying needed — just your oven or air fryer!
This sweet and spicy Korean-style chicken is crispy, flavorful, and easy to make at home.
If you’ve watched a K-drama or Korean movie, you’ve probably seen this dish before!
You don’t have to be Korean to make it — try cooking it yourself today! 🍗🇰🇷
기름에 튀길 필요 없이 오븐이나 에어프라이어만 있으면 충분해요.
달콤하고 매콤한 코리안 양념치킨, 집에서도 손쉽게 즐길 수 있답니다.
K-드라마나 영화에서 한 번쯤은 본 적 있을 거예요!
한국인이 아니어도 누구나 만들 수 있어요. 지금 바로 도전해보세요!


🛒 Ingredients / 재료

Chicken / 치킨 – – – – – – – – –

  • 1 lb chicken wings or drumettes
    닭윙 또는 닭봉 약 450g
  • ½ cup flour
    밀가루 1/2컵
  • ½ cup corn starch
    옥수수전분 1/2컵
  • ½ tsp salt
    소금 1/2작은술
  • ½ tsp black pepper
    후추 1/2작은술
  • 1 tbsp milk OR 1 tbsp water (optional, for better coating)
    우유 1큰술 또는 물 1큰술 (선택. 코팅 잘 붙게)
  • Cooking oil spray
    오일 스프레이 약간

Sauce / 양념 소스 – – – – – – – –

  • 2 tbsp gochujang
    고추장 2큰술
  • 2 tbsp ketchup
    케첩 2큰술
  • 2 tbsp honey or corn syrup
    꿀 또는 물엿 2큰술
  • 1 tbsp soy sauce
    간장 1큰술
  • 2 cloves garlic, minced
    다진 마늘 2쪽
  • 1 tsp sesame oil
    참기름 1작은술
  • (optional) sesame seeds or crushed peanuts for topping
    선택: 깨나 땅콩가루 약간

🍳Instructions / 만드는 방법

  1. Clean and dry the chicken.
    Rinse the wings or drumettes under cold water, then pat completely dry with paper towels.
    닭윙과 봉을 찬물에 헹군 뒤 키친타월로 물기를 완전히 제거하세요.
    (The drier the surface, the crispier it gets when cooked.)
    표면이 마를수록 더 바삭하게 구워집니다.
  2. Light seasoning.
    Add salt and pepper, then toss evenly to coat.
    소금과 후추를 넣고 골고루 버무립니다.
    (This step removes any raw smell and adds basic flavor.)
    이 단계에서 비린내가 제거되고 기본 간이 배어요.
  3. Optional soak (for tenderness).
    For juicier chicken, add 1 tbsp milk or water, mix, and let rest for 10 minutes.
    더 부드럽게 만들고 싶다면 우유나 물을 1큰술 넣고 10분간 두세요.
    (A little milk helps reduce the chicken smell even more.)
    우유를 약간 넣으면 냄새가 더 줄어요.

  1. Mix flour and corn starch in a bowl.
    Combine flour and corn starch in a large bowl.
    밀가루와 전분을 섞습니다.
  2. Add chicken and toss until evenly coated.
    Add the chicken and toss until the surface is lightly and evenly coated.
    닭을 넣고 겉면이 얇게 하얗게 코팅될 때까지 버무립니다.
    (The ideal coating is a thin, even white layer. No need for a wet batter.)
    겉면이 얇고 균일한 코팅이 이상적이며, 반죽처럼 묽게 만들 필요는 없습니다.
  3. Shake off excess.
    Gently shake off extra flour.
    가루가 과하게 붙은 부분은 가볍게 털어냅니다.
    (Too much coating can fall off and burn in the oven or air fryer.)
    너무 많이 묻으면 오븐이나 에어프라이어 안에서 타 맛이 날 수 있습니다.
  1. Light oil.
    Spray a thin layer of cooking oil over the coated chicken.
    코팅된 닭에 오일 스프레이를 살짝 뿌립니다.
    (This helps the surface brown evenly and stay crisp.)
    이 단계가 겉면을 고르게 바삭하게 해줍니다.
  2. Arrange in a single layer.
    Place the chicken pieces in a single layer without overlapping.
    닭을 겹치지 않게 한 층으로만 올립니다.
    (Overlapping traps moisture and prevents crisping.)
    겹치면 수분이 빠지지 않아 덜 바삭하게 돼요.
  3. Cook at 400°F (200°C) for 20–22 minutes. Flip halfway.
    에어프라이어를 200도(400°F)로 설정해 20~22분간 굽고, 중간에 한 번 뒤집습니다.
    Cook until golden brown and crispy on the outside.
    겉이 노릇하게 익을 때까지 조리합니다.
  4. Check doneness.
    The thickest part should be fully cooked and no longer pink.
    가장 두꺼운 부분이 완전히 익고 붉은 기가 없어야 합니다.
  1. Preheat to 425°F (220°C).
    오븐을 220도로 예열합니다.
  2. Use a rack on top of a baking sheet.
    Place a wire rack over a baking sheet and arrange the chicken on top.
    철망을 오븐팬 위에 두고 그 위에 치킨을 올립니다.
    (This lets air circulate and fat drip down for a crispier result.)
    공기가 순환되어 더 바삭하게 구워집니다.
  3. Bake for 25–30 minutes, flipping halfway.
    25~30분간 굽고 중간에 한 번 뒤집습니다.
  4. Optional crisp step.
    Broil on high for 2–3 minutes at the end for extra crunch.
    마지막에 브로일로 2~3분 더 구워 겉을 바삭하게 만듭니다.
  1. Combine all sauce ingredients in a small pan.
    In a small pan, mix gochujang, ketchup, honey (or syrup), soy sauce, minced garlic, and sesame oil. **The sauce ratio is detailed in the sauce ingredients section.
    작은 팬에 고추장, 케첩, 꿀(또는 물엿), 간장, 마늘, 참기름을 넣습니다.
  2. Heat on low until thick and glossy.
    Simmer over low heat for 3–4 minutes, stirring constantly, until glossy and slightly thickened.
    약불에서 3~4분간 저어가며 끓이다가 윤기가 돌면 불을 끕니다.
    (This creates a sweet-spicy gochujang glaze.)
    달콤하고 살짝 매콤한 코팅소스가 완성됩니다.
  1. Add cooked chicken to a large bowl.
    구워진 치킨을 큰 볼에 담습니다.
  2. Pour sauce and toss until evenly coated.
    양념소스를 부어 골고루 버무립니다.
    Each piece should be coated with a shiny red glaze.
    닭 전체가 윤기 나는 빨간 코팅으로 덮이면 완성입니다.
  3. Serve immediately.
    Serve hot and enjoy! Sprinkle sesame seeds or crushed peanuts on top if desired.
    바로 먹는 게 가장 맛있어요. 기호에 따라 깨나 땅콩가루를 올려도 좋아요.

💡 Extra Notes / 추가 팁

Air fryer is great for small batches.
Oven is better for feeding the whole table.

에어프라이어 버전은 양이 적을 때 편하고
오븐 버전은 가족용으로 한 번에 많이 만들기 좋습니다.

For mild kids’ version: less gochujang, more ketchup and honey.

소스의 매운 정도는 고추장 양으로 조절 가능합니다.

Leftover chicken can also be used the next day as a topping for toast, wraps, or salads.

남은 치킨은 다음 날 토스트/랩/샐러드 토핑으로도 사용 가능합니다.


Nothing beats crispy Korean fried chicken coated in sweet and spicy sauce.
It’s comfort food that brings people together — just like in K-dramas!
Make it at home, grab a cold drink, and enjoy your own little Korean night. 🍗✨