
Sweet & Spicy Gochujang Wings (Oven & Air Fryer Only)

No deep-frying needed — just your oven or air fryer!
This sweet and spicy Korean-style chicken is crispy, flavorful, and easy to make at home.
If you’ve watched a K-drama or Korean movie, you’ve probably seen this dish before!
You don’t have to be Korean to make it — try cooking it yourself today! 🍗🇰🇷
기름에 튀길 필요 없이 오븐이나 에어프라이어만 있으면 충분해요.
달콤하고 매콤한 코리안 양념치킨, 집에서도 손쉽게 즐길 수 있답니다.
K-드라마나 영화에서 한 번쯤은 본 적 있을 거예요!
한국인이 아니어도 누구나 만들 수 있어요. 지금 바로 도전해보세요!
🛒 Ingredients / 재료
Chicken / 치킨 – – – – – – – – –
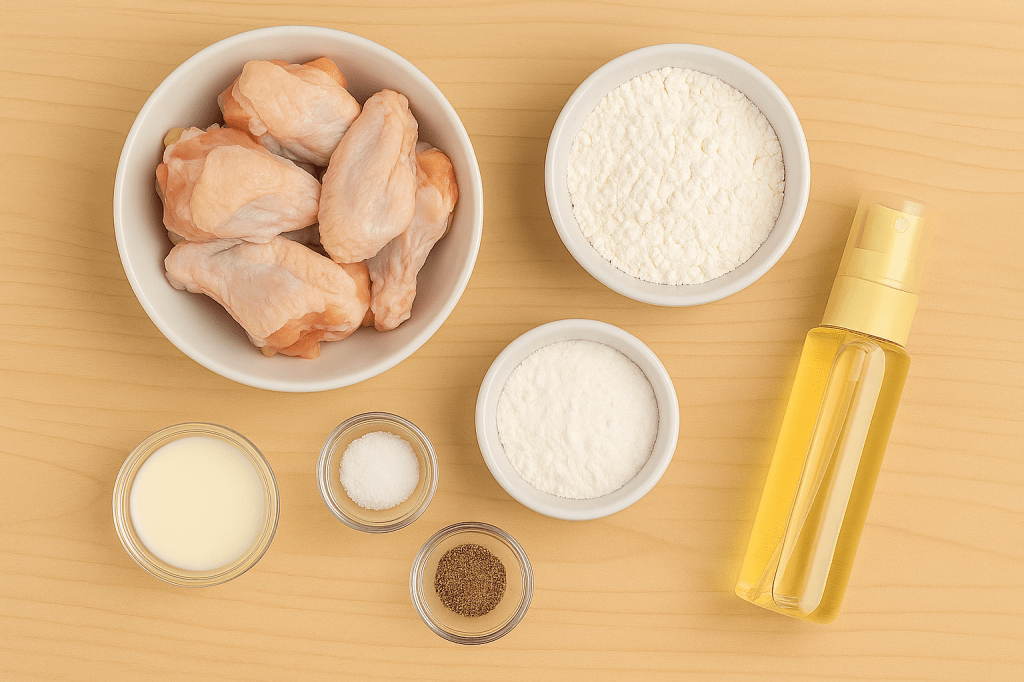
- 1 lb chicken wings or drumettes
닭윙 또는 닭봉 약 450g
- ½ cup flour
밀가루 1/2컵
- ½ cup corn starch
옥수수전분 1/2컵
- ½ tsp salt
소금 1/2작은술
- ½ tsp black pepper
후추 1/2작은술
- 1 tbsp milk OR 1 tbsp water (optional, for better coating)
우유 1큰술 또는 물 1큰술 (선택. 코팅 잘 붙게)
- Cooking oil spray
오일 스프레이 약간
Sauce / 양념 소스 – – – – – – – –
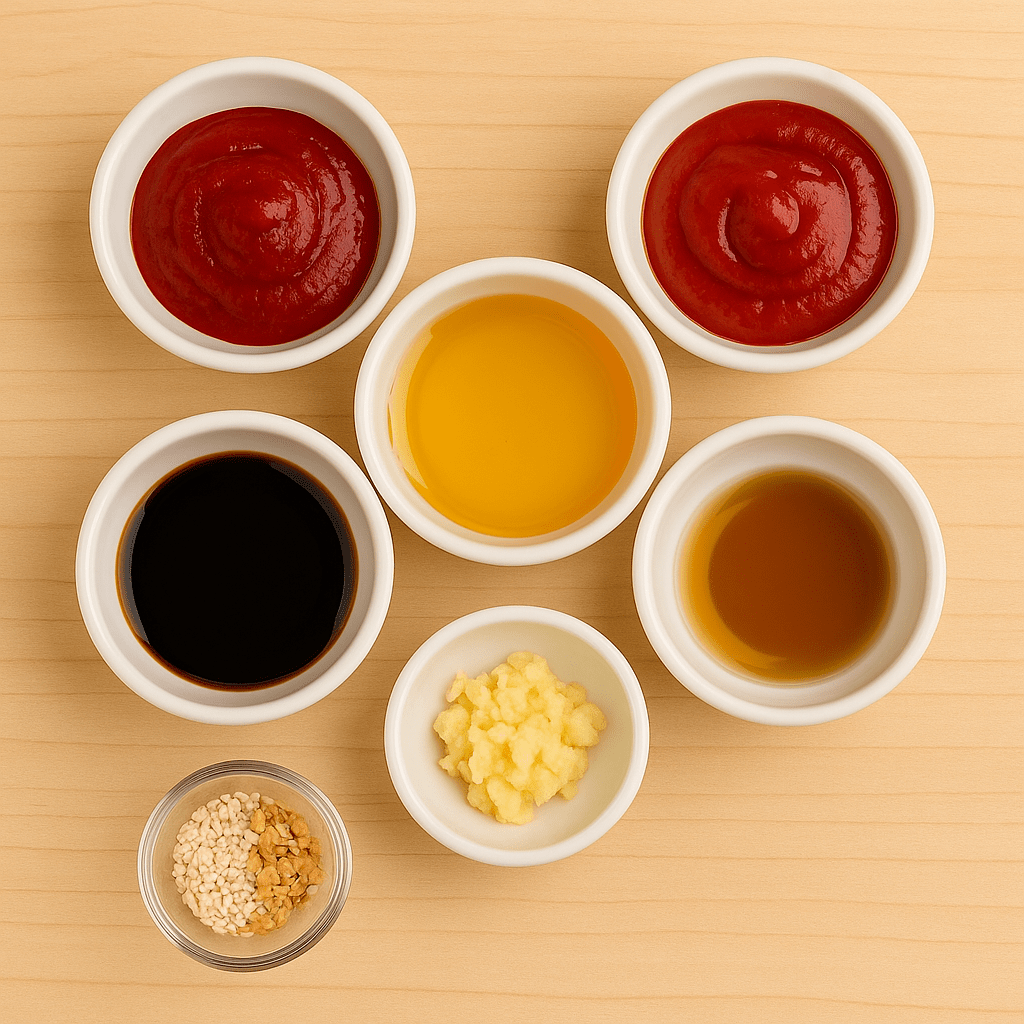
- 2 tbsp gochujang
고추장 2큰술
- 2 tbsp ketchup
케첩 2큰술
- 2 tbsp honey or corn syrup
꿀 또는 물엿 2큰술
- 1 tbsp soy sauce
간장 1큰술
- 2 cloves garlic, minced
다진 마늘 2쪽
- 1 tsp sesame oil
참기름 1작은술
- (optional) sesame seeds or crushed peanuts for topping
선택: 깨나 땅콩가루 약간
🍳Instructions / 만드는 방법
🔄 Step 1. Prep the Chicken 1단계. 치킨 준비하기
- Clean and dry the chicken.
Rinse the wings or drumettes under cold water, then pat completely dry with paper towels.
닭윙과 봉을 찬물에 헹군 뒤 키친타월로 물기를 완전히 제거하세요.
(The drier the surface, the crispier it gets when cooked.)
표면이 마를수록 더 바삭하게 구워집니다. - Light seasoning.
Add salt and pepper, then toss evenly to coat.
소금과 후추를 넣고 골고루 버무립니다.
(This step removes any raw smell and adds basic flavor.)
이 단계에서 비린내가 제거되고 기본 간이 배어요. - Optional soak (for tenderness).
For juicier chicken, add 1 tbsp milk or water, mix, and let rest for 10 minutes.
더 부드럽게 만들고 싶다면 우유나 물을 1큰술 넣고 10분간 두세요.
(A little milk helps reduce the chicken smell even more.)
우유를 약간 넣으면 냄새가 더 줄어요.
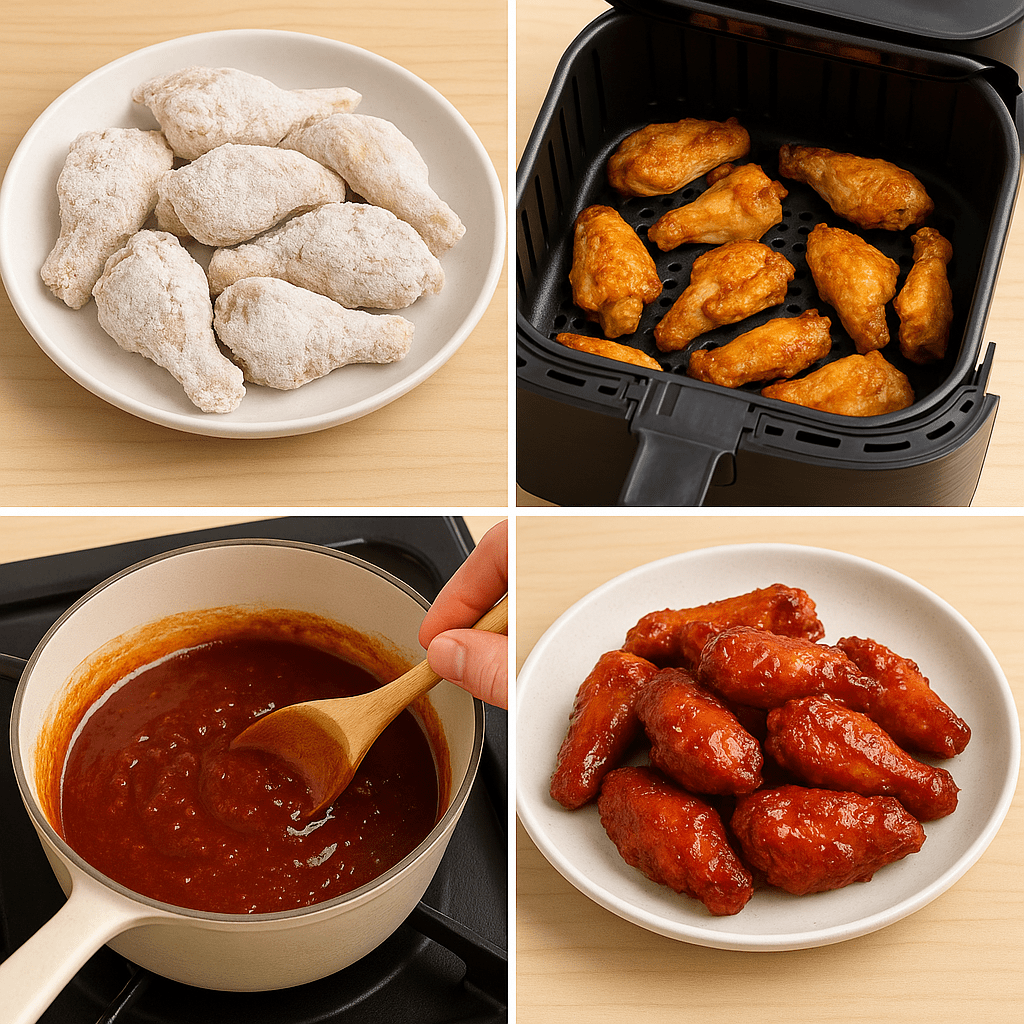
🧂 Step 2. Coat the Chicken 2단계. 코팅 입히기
- Mix flour and corn starch in a bowl.
Combine flour and corn starch in a large bowl.
밀가루와 전분을 섞습니다. - Add chicken and toss until evenly coated.
Add the chicken and toss until the surface is lightly and evenly coated.
닭을 넣고 겉면이 얇게 하얗게 코팅될 때까지 버무립니다.
(The ideal coating is a thin, even white layer. No need for a wet batter.)
겉면이 얇고 균일한 코팅이 이상적이며, 반죽처럼 묽게 만들 필요는 없습니다. - Shake off excess.
Gently shake off extra flour.
가루가 과하게 붙은 부분은 가볍게 털어냅니다.
(Too much coating can fall off and burn in the oven or air fryer.)
너무 많이 묻으면 오븐이나 에어프라이어 안에서 타 맛이 날 수 있습니다.
🍳 Step 3A. Air Fryer Method 3A단계. 에어프라이어 조리
- Light oil.
Spray a thin layer of cooking oil over the coated chicken.
코팅된 닭에 오일 스프레이를 살짝 뿌립니다.
(This helps the surface brown evenly and stay crisp.)
이 단계가 겉면을 고르게 바삭하게 해줍니다. - Arrange in a single layer.
Place the chicken pieces in a single layer without overlapping.
닭을 겹치지 않게 한 층으로만 올립니다.
(Overlapping traps moisture and prevents crisping.)
겹치면 수분이 빠지지 않아 덜 바삭하게 돼요. - Cook at 400°F (200°C) for 20–22 minutes. Flip halfway.
에어프라이어를 200도(400°F)로 설정해 20~22분간 굽고, 중간에 한 번 뒤집습니다.
Cook until golden brown and crispy on the outside.
겉이 노릇하게 익을 때까지 조리합니다. - Check doneness.
The thickest part should be fully cooked and no longer pink.
가장 두꺼운 부분이 완전히 익고 붉은 기가 없어야 합니다.
🔥 Step 3B. Oven Method 3B단계. 오븐 조리
- Preheat to 425°F (220°C).
오븐을 220도로 예열합니다. - Use a rack on top of a baking sheet.
Place a wire rack over a baking sheet and arrange the chicken on top.
철망을 오븐팬 위에 두고 그 위에 치킨을 올립니다.
(This lets air circulate and fat drip down for a crispier result.)
공기가 순환되어 더 바삭하게 구워집니다. - Bake for 25–30 minutes, flipping halfway.
25~30분간 굽고 중간에 한 번 뒤집습니다. - Optional crisp step.
Broil on high for 2–3 minutes at the end for extra crunch.
마지막에 브로일로 2~3분 더 구워 겉을 바삭하게 만듭니다.
🍯 Step 4. Make the Sauce 4단계. 양념소스 만들기
- Combine all sauce ingredients in a small pan.
In a small pan, mix gochujang, ketchup, honey (or syrup), soy sauce, minced garlic, and sesame oil. **The sauce ratio is detailed in the sauce ingredients section.
작은 팬에 고추장, 케첩, 꿀(또는 물엿), 간장, 마늘, 참기름을 넣습니다. - Heat on low until thick and glossy.
Simmer over low heat for 3–4 minutes, stirring constantly, until glossy and slightly thickened.
약불에서 3~4분간 저어가며 끓이다가 윤기가 돌면 불을 끕니다.
(This creates a sweet-spicy gochujang glaze.)
달콤하고 살짝 매콤한 코팅소스가 완성됩니다.
🥣 Step 5. Toss and Finish 5단계. 마무리
- Add cooked chicken to a large bowl.
구워진 치킨을 큰 볼에 담습니다. - Pour sauce and toss until evenly coated.
양념소스를 부어 골고루 버무립니다.
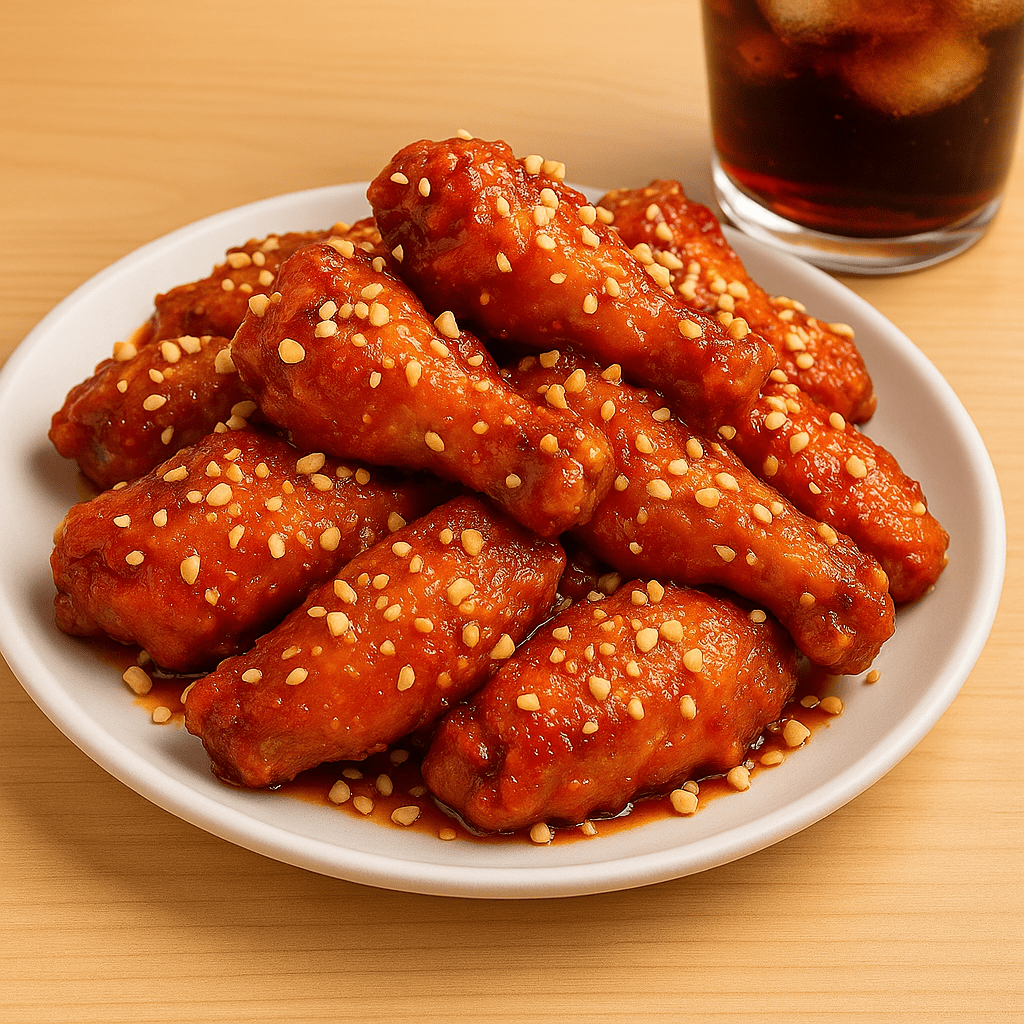
Each piece should be coated with a shiny red glaze.
닭 전체가 윤기 나는 빨간 코팅으로 덮이면 완성입니다. - Serve immediately.
Serve hot and enjoy! Sprinkle sesame seeds or crushed peanuts on top if desired.
바로 먹는 게 가장 맛있어요. 기호에 따라 깨나 땅콩가루를 올려도 좋아요.
💡 Extra Notes / 추가 팁
Air fryer is great for small batches.
Oven is better for feeding the whole table.
에어프라이어 버전은 양이 적을 때 편하고
오븐 버전은 가족용으로 한 번에 많이 만들기 좋습니다.
For mild kids’ version: less gochujang, more ketchup and honey.
소스의 매운 정도는 고추장 양으로 조절 가능합니다.
Leftover chicken can also be used the next day as a topping for toast, wraps, or salads.
남은 치킨은 다음 날 토스트/랩/샐러드 토핑으로도 사용 가능합니다.

Nothing beats crispy Korean fried chicken coated in sweet and spicy sauce.
It’s comfort food that brings people together — just like in K-dramas!
Make it at home, grab a cold drink, and enjoy your own little Korean night. 🍗✨
